Quantcast
Channel: Handmade By Heather B
Viewing all 231 articles
Browse latest View live

A FESA Non Complete

$
0
0
My freak out about Christmas sewing post probably clued you into the fact that the FESA list was not going to be finished before the deadline.  I couldn't in good faith sew more items for myself after being shocked at the number of gift crafting days left.  Maybe I am slowly making progress on my sewing procrastination problem.

So let's take a quick look at my planned FESA list and how much was completed. It's actually not that bad considering I'm a "Oh squirrel" sort of sewist.

1. Wearing History Smooth Sailing Trousers
The originally planned navy pair was completed in September.  I also decided to make a second pair in some stretch wool tweed without the cuffs.  (Confession, there wasn't enough fabric for cuffs)
The too big waistband was fixed on the second pair.  First I removed the extra ease added added to the CF. Then the pants were sewed at a 5/8" seam allowance instead of at 1/2" like suggested.  The wider seam allowances compensated for the lycra in the wool fabric.  I also did a last minute fit check by basting on the waistband and trying on the pants. All those changes yield a perfectly fitting waistband, huzzah!  

2. Betsy pencil skirt out of black pleather
After thinking about this for awhile I wasn't sure that a pleather skirt would actually get worn.  Instead I sewed a new Betsy out of some leopard denim in the stash.

3. Sew Over it Anderson Blouse
Completed in September and the blouse happens to go pretty well with the smooth sailing pants. Not that I have any decent pictures of it.

4. The Wiggle dress from Gertie's first book
Oh yeah, like you could forget that dress being finished. 

5. Vintage McCall's slip
Nope, didn't happen.  The pattern did get as far as being muslined/fitted so maybe I'll pick it up after the holidays are over. Maybe.

6. Leapfrog socks
Yes I did finish that pair of socks quietly in the background.  My cold toes are very happy about it.

8. Knit a beret.
Nope, still no new berets for me. I must don the ribbons of shame.....or take a beret pattern with me during our Thanksgiving visit to the in-laws.  Yes, YES! Beret redemption is within my grasp. Unless I eat so much that my free time is spent dozing on a couch.

P.S.
I also sewed a couple of these tops where are a hack of the Grainline Studio Lark Tee.  More info on that later this week.

Pattern Hacks are Back

$
0
0
Those of you who have enjoyed my various pattern hacking posts in the past will be pleased to learn that I'm back to my old Frankenstein tricks.  As of today I'll be writing a monthly pattern hacking column for Pattern Review. Eep.

To start things out I decided to go super simple and modify the Lark Tee from Grainline Studio. The neckline was changed to a be much higher with a folder over facing.  The hem is also modified to have a facing with side seam split. You can get all the details here over on the PR blog.  And if you want to see this same shirt in a solid just take a gander at my previous post.
Going forward I'm hoping to write more complicated pattern hacks and to use various pattern companies, both independent and the Big 4. Just as long as inspiration cooperates with my plans. :)
If there's any sort of pattern hack you're dying to see in the future just let me know here or over on the PR blog.  Happy hacking my friends. :)

Thanksgiving Outfit - Butterick 6285

$
0
0
This year the sewing fairy must have had a slow night, because she paid me a little visit to specifically dictate a Thanksgiving outfit. Usually my dressing concerns for America's favorite eating holiday are, A. Does it have an expandable waist and B. Will the sleeves accidentally fall into the gravy boat? Bonus points if fabric that doesn't readily show grease stains. Using these rules I usually put together an outfit without much fuss or pre-planning. The sewing fairy was having none of that and whispered in my ear that I "needed" to have a leaf print skirt for Thanksgiving.  It's Fall and leaves are festive....or something like that.  She probably knew I'd outright laugh at her if she suggested festooning myself with turkeys.
I did laugh at the thought of Thanksgiving specfic sewing anyway.  My desk already has a Christmas sewing list a mile long, like hell another item is going on there. The sewing fairy just looked at me and smiled slyly. "Of course my dear, do whatever you want.  You should probably stay away from that Etsy website after all. You know how you like to spend money on there." Say what now?! Wild horses could not keep me away from the Etsy site now.  I'll show you sewing fairy!!! And that's how I ended up purchasing 4 yards of vintage cotton with red/black leaves.
Once that yardage entered my house I felt contractually obligated to sew it up. Man that sewing fairy is a wily one! It's like she knows all my sewing weakness....or paid someone for information.  I'm looking at you froggie!  Well at least I could put that impulse buy of Butterick 6285 to good use.
Having been burnt by Big 4 ease in circle skirts before, I measured the waist area before tracing. Hooray for sometimes learning lessons from past projects. My ruler told me that Butterick had drafted this pattern with more ease than I'd like.  Two inches of ease has been added to the waist measurement for each size, so the size 16 with a 30" waist will have a 32" finished waistband.  My waist is exactly 30" so I dropped down to the size 14 and muslined up the skirt as is. That muslin did "zip up," but felt like it might grow uncomfortable as the day wore on.  Figuring it was a smart thing to do, I added 1" of ease around the side seam area......which made my final garment about 1" too big in the waist.  HAA HAAA HAAA, sob.   The waistband was left that way for Thanksgiving for obvious reasons.....specifically pie.  However I will HAVE to go back and take in the waistband because the skirt kept falling forward off my waist all day. It drove me crazy having to constantly adjust it.

One other thing to note about this pattern is that the CB seam and side seams are drafted with a 1" seam allowance and I'm not sure why. The directions do show you how to recess the pocket bags, sewing them at a 3/4" seam allowance so they disappear into the seam a bit better.  I do think this is a nice feature, but you don't need a whole 1" of seam allowance to do so. Dare I say that a standard home sewing 5/8" seam allowance is more than enough to accomplish the same thing. OK, my college prejudices of 5/8" SA being way too big might be showing. Let's just say that if you need to save some fabric you can always cut those areas down. Forewarned is forearmed or something like that.

 Pattern
Butterick 6285 - Skirt portion only.

Fabrics used
Vintage cotton, closer to dress weight than quilting weight.

Pattern changes/alterations
1. I went down one size and added an 1" of ease to the waistband.

2. Added 3" of length for a finished length of 27".

Confessions/Advice
- You will want to stay stitch the skirt waist on this pattern immediately. I found it grew with even the lightest amount of handling.

- I'd meant to give you some photos of the skirt with a petticoat underneath and forgot to pack it for our trip to the in-laws. Anyway it's a nice look for the design if you want more fullness.

- The top in these pictures is a Nettie hack that is in no way ready for prime time. There's not enough ease for a faux wrap style and it's trying to gape open at every opportunity. In fact I'm going to rip it apart and turn it into a regular V-neck.

Husband Comment
"Oh did you make that too?  What's happening here with the extra fabric? Oh pleats? That's cool."

My Final Thoughts
I bought Butterick 6285 more for the kimono top than for the skirt, but really enjoyed sewing up the bottom portion.  I like the double pleats and the fact that the pattern comes with pockets.  Since only the waist area needs to be fitted, it's a quick pattern to bang out.  It took merely a week to sew both the muslin and the real garment. Guess the fabric fairy was right about me needing a new skirt after all. So if you'd like to add another cute circle skirt/kimono top to your pattern collection, then pick this one up during the next Butterick sale.

PR Pattern Hacks - The Christmas Nettie Dress

$
0
0
As usual in December I disappear off the blog due to a flurry of Christmas preparations and the germs my child sneaks home in his pocket. However froggie is happy to report that all the Christmas present sewing got done and he helped me wrap the last box up. Such a helpful amphibian. We also did some semi-behind the scenes sewing for this month's PR pattern hack column.  If you follow me on IG you probably saw several poorly lit muslins of this dress show up on my feed.  Finally the reveal day is here and I can show you some decent and seasonal photographs.
This month's hack was inspired by a vintage jersey dress that popped into my own IG feed. The original was a feisty leopard print and which of course grabbed my attention.  I thought it was a nice combo of a sultry silhouette paired with the practically of pockets and comfy knits. So I went to my trusty copy of the Closet Case Files Nettie pattern and hacked one for myself.  Now you can find out how to do it too over the PR blog.  Happy hacking and a slice of pie for you all.

2015 Stash Busting Wrap Up

$
0
0
Happy New Year to all my sewing friends!  I've spent the last week and a half after Christmas furiously finishing a coat before the end of the year and then reorganizing/cleaning various areas of my house. Also stuffing copious amounts of cookies into my mouth and refusing to take any Christmas decorations down. Gotta make sure to balance all that virtuous stuff with a little vice.

Tis the season for year end review, a trend which I am not immune to. Heck the blog is probably my only "accountability" partner since Froggie is the perfect enabler.  So let's start with a look how my stash busting goal for 2015 worked out.

In case you've forgotten, and why would you remember, my goal was to get one of these rubbermaid containers off the floor and into the stash closet. Here's a pic from 2015.
Did this happen....Nope.  Here's the same area today. Other than the knits in the basket being level it looks the same. (Though I am pretty pleased with myself for keeping the top of my dresser clean for about half a year.)
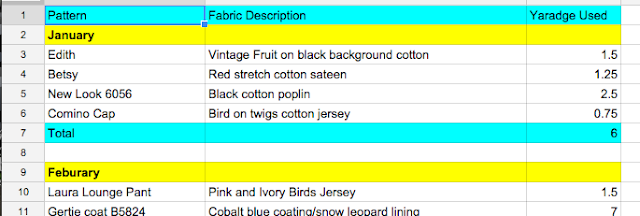
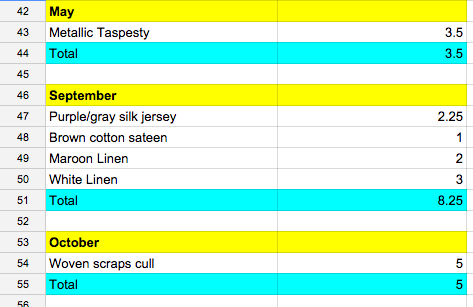
So that's the bad news.  The good news is that I kept spreadsheets on how much was sewn/removed in other ways, and purchased. Those numbers tell a much more successful stash busting story for the year.

First of all fabric acquisition was way down from last year. In 2014 I added 154.75 yards to the stash, in 2015 that number was a more manageable 83.75 yards. Also about 40% of the new additions were also sewn into garments during the year.  Those fabrics that are still stashed fall into my "yellow layer" designation where I think, "Yeah I'm glad I bought that." Overall I feel that I've modified my fabric buying habits in a successful way that actually reflects what I like to sew and wear. In case you're interested how this was accomplished, here's what worked for me.

1. Figured out my color palette and sticked to it.
I will be eternally grateful to Gillian for doing a blog series on this which gave me a kick in the butt to get working on this.  Even though I had a general idea of what colors were flattering to my coloring, my stash didn't always reflect this. Sometimes an interesting print would catch my eye and I'd buy it even though it was olive, ivory, some other color that makes me look ill.  Problem is that you can't do anything to those colors look good on you.  I'd sew that fabric up, put the garment on and immediately take it back off again. That's wasted money, time and closet space, not to mention latent guilt about all 3 of those things. So I stopped thinking of a color palette as something that constricted my creativity and embraced it instead.

If you go by seasonal color palettes I fall into the winter category. Here's a sample palette that I yonked off the internet.  Now most of these colors look "right" for my coloring, with the exception of that pale yellow, however they are not all colors that I like to wear.  Last year I took outfit photos almost every day for a couple of months and that helped me nail down what my personal palette is.
I like to wear a lot of bright but cool toned red, black,white and navy.  Bright/cool toned blues and greens also get mixed in regularly, but fabric in those colors is harder to find so they make up a smaller percentage of my closet. Similarly cool toned yellow is almost impossible to find, so you don't see me wearing a lot of it. I love pink in floral prints, but seem to hate it in anything else.  Finally as I've gotten older the color gray has mostly fallen out of favor. It is a flattering color, but I seem to be gravitating towards black or navy instead. Now I keep these preferences in mind whenever I think about purchasing a fabric.

2. Tracked what types of fabric got sewn the most. 
This was a side benefit of keeping spreadsheets showing what patterns/fabric were sewn through the year. Even though I love buying all types of fabrics, my stats clearly show that I mostly sew cotton wovens and knits. It also shows that I tend to make a small dent in the wool stash during the Fall and only 1 or 2 silk projects get sewn during the year.  I've kept these stats in mind whenever the fabric buying mood strikes me. Right now my personal buying rules are:
- All cottons in the color palette are fine to buy. Bonus points if they are in my favorite prints - florals, tropical plants and birds.
- Buying wool or rayon for a particular project is fine, but don't stash either of these fabrics without plan.
- Silk buying ban remains. Just shop the stash instead.

I pulled out a couple of fabrics bought and stashed 2015 to illustrate.  From the top left - Red wool jersey with black flicks, Red/Navy/White cotton - block print with birds, Black/white tropical print cotton, Dark Navy denim, Pink roses on black cotton and pink roses on white cotton.  I've purchased the wool jersey to knock off a knit dress and the denim is for jeans.  The rest of the cotton has no plans as of yet. However that's fine because they are in color palette, are my most sewn type of fabric and are my favorite type of prints.
Asking myself, "Is this in my color palette?" and "Does it fit my buying rules?" has cut down on buying overall and given me a stash with more things I want to sew.

3. Actively shopped the stash more
Sometimes when the itch to buy more fabric came a calling I did close the computer and go rummaging through the stash. Before buying new patterns I also thought about what fabrics in the stash would work with them. Overall I did pretty well using what I already had instead of buying new.

4. Looking at the numbers
Finally actually looking at the amount of yardage sewn and bought for the month was sometimes enough to table purchases. My goal was to sew more than I bought every month and consulting the tally was a good reality check.  It's easy to forget how much you might have bought earlier in the month. In 2015 I only went "into the red" with fabric purchases in July and August. I'll take 2 months out of 12 as an acceptable level of, "Oops, did I do that?"

Now that I've gone on and on about buying fabric during "stash busting" did my stash actually get smaller in 2015?  It did!!  After subtracting all the purchases I'm still down 161.25 yards for the year. Not all of that was sewing, some was rehoused in other people's stashes.  Big Thanks to those of you who purchased my "regrettably changed taste layer." I'm glad those pieces have gone to good homes.

So if I reduced the stash by 161.25 yards and there's still no room in the stash cave then it must mean my 2015 goal was just a little over ambitious. Just a little.  Seems after all these years I still have no idea how much space X number of yards takes up in anything other than wool coating.  But you know what, I moved all the wool coating into that bin so now it's only something like 4 sewing projects away from being empty. Because of this I'm making 2016 stash busting goal the same as last years.  Here's to 2016 and more floor space in my bedroom!

My Stash Busting Spreadsheet

$
0
0
Hi guys, today's post is a little info dump about my record keeping since some of you expressed interest after reading my last post. My spreadsheet is pretty basic, so it was no trouble to take a few screen shots to show you how I record yardage in and yardage out.

First of all I have to thank my sewing friend and serial stasher in crime Katie for giving me the idea of a spreadsheet in the first place. Three years ago she send me a copy of her own excel file and I dumbed it down a bit for my own purposes.  For example Katie keeps track of sewing for individual family members and types of garments for herself.  My sewing is much more....Heather centric you might say. A simple column of patterns and fabric is enough info tracking for my uses. Which is a great thing about spreadsheets, they can be as simple or complex you want.

I use the spreadsheet program in Google docs for my sewing records because my main "computer" is actually a chromebook.  I can't install any software on it, so all applications need to be web based.  That's fine with me because being able to access the file from any location has been helpful in the past.  I started with a blank spreadsheet and added 4 tabs to it.  Those tabs are, sewing, purchases, fabric removed non-sewing and monthly total.

Not surprisingly the "Sewing tab" is where all the garments sewn during the year are logged.  I record the pattern name or number, a brief description of the fabric and the number of yards used. Each month is split out separately so that the total yardage can be tracked.

On the flip side the "Purchases tab" tracks all the fabric coming into the stash during the month. I also log any fabric gifts on this tab, but give them a red background. That way I know if a stash influx isn't something I should feel that guilty about. After all fabric gifts are always good even if they up your numbers. On this tab only a description of the fabric and the yardage acquired are recorded.

The "Fabric removed non-sewing tab" is for any fabric sold in the Etsy shop and stuff I decide to throw away. Usually it's a ton of small scraps that I either don't feel like sewing or are too small really too use. (Lillestoff is so hard to throw away.)

At the end of the month the "Monthly Total tab" is filled out so that I can easily see how I'm doing with my stash busting goals.  The sewing/fabric removed non-sewing numbers are added together and put in the "Total Removed" column.  All fabric purchases and gifts logged in the "Total Added" column.  Then I subtract the two numbers and record how much fabric has been removed/added to the stash.  Here's my entire 2015 year below. 
So that's all the details on my stash busting spreadsheet. I hope that sparked your creative juices if starting your own sewing recordkeeping is something you'd like to do in 2016.  

Being Wooed By The Fourties

$
0
0
Since January is the month of goals/planning, I've been thinking about what vintage patterns need to be sewn this year. Usually my go to era is the 50's and the old mental sewing list might still contain a pattern or two from that decade. However I've been seeing a shift towards the 40's in my tastes of late.  I've always enjoyed browsing 40's patterns, but have shied away from making them.  The whole slim hipped/flat butt part of the silhouette was not in the genetic cards for me. In fact my deck is stacked just like my backside. ;) So for years I've only enjoyed watching tall drinks of water like Cate Blanchett float around in 40's confections and left at that.  Then Agent Carter happened. 
If you aren't watching Agent Carter than you should be. Admittedly I jumped on board last year just for the costumes, but quickly discovered that it had excellent writing and was highly entertaining. And then there's Hayley Atwell as titular character who is just delightful. I think she perfectly embodies the strong and resourceful woman that is Agent Carter..... and her costumes are great.  So as I was happily watching the show last year it struck me that Hayley Atwell doesn't have the stereotypical 40's body. I'm sure she's 2" taller and 20 pounds lighter than me, but she does have a curvy figure that's a lot closer to mine than all those 40's fashion illustrations.  My brain finally said, "Hey wait, Hayley looks good in all these 40's fashions. I bet you could too." In hindsight it's a bit of a duh moment right? Of course women of all shapes and styles wore the same fashions in the 40's.  Sometimes you just get an idea in your head that something's "not for you" regardless of any evidence to that effect.  So in 2016 I plan to sew up a couple 40's patterns and see if I enjoy wearing them.

First up is a new pattern acquisition which is pretty exciting.  A suit set from Hollywood patterns, #1032.
I'll be making the shorter skirt version because that will get more wear.  I'll also straight up be copying the red jacket/black skirt combo because they might as well have designed that for me.  We'll have to wait and see if I go frogs or button closure. Ribbit.

In the flurry of December I purchased this pretty separates pattern from Du Barry, #5510.
Not sure if a woven wrap blouse will work on my body, but these girls make me want to try it. Color and type of fabric to be determined.  (The stash probably has something that would be perfect.)

When it gets warm again I'd like to finally make up a dress pattern that's been sitting in the stash for awhile, Advance #4227.
This design would look cute in either some light weight cotton or rayon. I will have to see what my tricky fabric meter is set to when it comes time to actually sew it.

I'd also like to try a 40's button down blouse but don't own a pattern like that yet. Oh darn, guess I'll have to spend hours browsing on Etsy to find one.  How we "sacrifice" for our craft, but we must work through the pain. 

So those are the closest thing to sewing plans that I have for the year. We'll see how my foray into the 40's actually goes. I may chuck it all and just wear artfully draped fabric yardage on my body instead.

P.S. Since I'm a super fan though I'd mention that you can watch season 1 of Agent Carter for free on ABC go this week and the new season starts on Jan 19 at 9pm. Go give yourself a treat. 

Veronica Enters the Scene

$
0
0
As someone who hoards a lot of fabric it's no surprise that there are several pieces "waiting for the right pattern to come along." Yes I know this is a recipe for disaster ending with adult Desmond chucking yards of fabric in a waste bin while grumbling about his mother. (Don't do it future Desmond, I will come back and haunt the poop out of you.) The horror of my pretties being incinerated should light a metaphorical fire under my butt and it often does.  However there are certain yardages that seem to be immune to this. They are still waiting for their perfect pattern and every once in awhile that right pattern does magically appear  This was the case when the Veronica coat popped up in my IG feed in mid December. I immediately thought, "Squuuuueeeee, this is the perfect thing for the 3 yards of plaid magenta coating that has been in the stash forever."
This fabric is so old that I'm not quite sure how old. It predates both my son and the purchase of our house so it's at least 6 years, but could be a little older than that.  Those of you with 15-20 year old pieces in your stash are laughing at me right now.  ;) For my stash this is pretty much the bottom layer as long as you don't count the accumulated years of inherited pieces of fabric.  This coating was originially purchased from Emmaonesock.com in one of those, "It must be mine......I don't care what it costs....take my money please," sort of moments.  Between the lovely colors and the plaid being woven on the diagonal it was too awesome to pass up. It was also too awesome to sew. No pattern pairing ever seemed right for it, which is why it was still sitting in the back of the closet in late 2015.
Thrilled to have finally found this fabric's pattern mate, the PDF pattern of the coat was purchased so I didn't have to wait to start it.  The pattern was assembled, traced off and a muslin was made in about a week. Can you tell I was excited?  Everything looked great so I got out the plaid coating, unfolded and found......it was covered in bug holes. NOOOOOOOOOOO!!!!! This picture doesn't look too bad, but it was actually the heaviest part of the damage being the outside layer when the fabric was folded. The bugs seemed to like the magenta parts and would eat down to the backing layer which is black.  You can see the biggest hole in the photo, but there were a lot of smaller one's peppered throughout the fabric. I thought the project would have to be scraped right then and there.
After some self pity induced cookie eating, I took a closer look at the fabric and found that the left side of the fabric was in pretty good shape.  Sometimes what looked like holes were actually areas where black fiber had clumped when the fabric was being made. On the flip side more holes were found in the right side of the yardage, which made plaid matching a big concern.  Damn you bugs!!!!  In the end I just got stubborn and started cutting the coat out thinking, "I am going to make this work!"  Long story short, there was enough undamaged fabric to cut all the pieces out and I got pretty good plaid matches.  One side seam is off because the plaid repeat seemed to bias a bit at the fabric edges. I could either plaid match the CB or the side seam, but not both. I did find two small bug holes that escaped my notice while sewing. Thankfully neither went all the way through the fabric or was that noticeable. Since there was literally no more undamaged fabric to work with I'm going to call it a win.

After all the drama of cutting out this project the rest of it went pretty smoothly. I did need to thread trace all the buttonhole and pocket placement lines because no marker/chalk/wax showed up on this fabric. Thread tracing was a bit annoying, but it turned out to be good TV watching project. That must have given me the hand sewing bug because it suddenly sewn in interfacing seemed like a great idea! I got out the lightweight horsehair interfacing and and hand sewed it all into the body of the coat 1940's style. Yeah, I don't know what came over me either. After that it was mostly straightforward machine sewing, with the exception of the hems.  I did hand sew them up with some rayon seam tape like the instructions suggested. The final bit of drama was the buttonholes.  Now my Bernina is an absolute trooper with buttonholes when compared to my last sewing machine. This wool/mohair blend was just a bit more than it could handle, soo sooo squishy. During the 4 hour buttonhole sewing process I was pretty jealous the NY girls who can pay someone to put buttonholes in using an industrial machine. NY ladies, that is money well spent. Saves you from having to use every screaming/crying emoji on your iPad and inhaling so much mohair fluff that you feel like you've been licking goats. I'm sure someone enjoys licking goats as recreation, but I'll pass.
Let me talk about the pattern for a minute. The Veronica coat is what Wearing History categorizes as a "Resto-Vival" pattern. This means it is a vintage pattern that has been slightly reformatted and graded to include a number of sizes.  For example this 40's coat was originally an unprinted pattern with holes punched out to indicate darts, grain lines, etc. Wearing History transfered all this info into printed lines similar to more modern patterns. The actual drafting of the garment remains the same, which the exception of there being two sleeve cap options offered. (More on that in the Confessions/Advice area) The directions are also the originals with a few added notes from the Wearing History clearly marked "WH Notes." The 1940 directions are sparse compared to modern ones, but if you have prior coat making experience this won't be a problem. Personally I preferred this sort of reissued pattern to ones where the drafting gets dumbed down for modern sewist. And as someone who barely reads instructions for any project, using the original ones was no problem.

Pattern
Veronica - 1940's Coat from Wearing History. I sewed View 2.

Fabrics used
Wool/mohair coating from the stash.
Warm coat lining from Emmaonesock.com
Pattern changes/alterations
1. 1/2" Forward shoulder alteration to the shoulder and sleeve.

2. I added a 1" pleat to the CB of the lining.

Confessions/Advice
- This is a large PDF pattern.  Those of you who feel like PDF patterns are puzzles to put together will be fine with it. There's a printed version available for those of you who think PDF patterns are the work of the devil.

- When you look at the pattern sheet you'll see that there is an modified sleeve cap option towards the top. WH explains that as drafted the sleeve is much puffier than what the fashion illustration shows.  They provide the smaller cap that can be swapped and give you the flatter look of the illustration.  If you want to be 100% authentic you can trace the sleeve as is and use the original sleeve cap.  For my coat I used the modified sleeve cap with the shorter sleeve head.

- I prefer to have some waist definition in my coats, which is why I went with the belted view 2.  Some of you don't have the same tastes so I took an unbelted photo just for you.
- I think there is a typo on page 4 of the instructions. There is says most of the pattern has a 1/2" seam allowance but the side seams, underarms and CB all have a 3/4" seam allowance. I found my collar did not fit in properly with a 3/4" CB seam.  Went back and made it 1/2" SA and then the collar fit perfectly.  (The 3/4" SA was used for the side seams and underarms on my coat.)

- I did forget about that 3/4" SA on the lining and sewed the whole thing at 1/2".  Happily the thickness of the wool meant it fit perfectly at that size.

- The lapel buttonhole was left off because I like wearing my collars open. Also because I couldn't face trying to sew another buttonhole and my child had heard enough profanity for the day.

Husband Comment
"What fictional character are you talking to in this coat?  Claude Rains?  Are you using him or his he taking you for a ride?  Also it's got big pockets."

My Final Thoughts
I've been thanking my lucky stars that this plaid coating wasn't completely destroyed by whatever stealthily munching bugs were involved.  It would have been a crime against old man winter....or maybe just would have reduced me to eating half a pan of brownies in one sitting. Either way not a good scene.

So far Veronica is in heavy rotation with my blue Butterick 5824 and I like having a shorter coat length option in the mix. The big patch pockets are really handy for keys, gloves and about 8 rocks that your kid picked up on the way home from school. He even said, "Ooooo these pockets are so big," as he stuffed a rock into them. Oh and I got to buy a new hat to go with this so winning all around. So with that I'm off to play a dame lurking the shadows in some Film Noir. My pocket full of rocks should come in handy.


PR Hacks - The Nettie Christmas Dress

$
0
0
As usual in December I disappear off the blog due to a flurry of Christmas preparations and the germs my child sneaks home in his pocket. However froggie is happy to report that all the Christmas present sewing got done and he helped me wrap the last box up. Such a helpful amphibian. We also did some semi-behind the scenes sewing for this month's PR pattern hack column.  If you follow me on IG you probably saw several poorly lit muslins of this dress show up on my feed.  Finally the reveal day is here and I can show you some decent and seasonal photographs.
This month's hack was inspired by a vintage jersey dress that popped into my own IG feed. The original was a feisty leopard print and which of course grabbed my attention.  I thought it was a nice combo of a sultry silhouette paired with the practically of pockets and comfy knits. So I went to my trusty copy of the Closet Case Files Nettie pattern and hacked one for myself.  Now you can find out how to do it too over the PR blog.  Happy hacking and a slice of pie for you all.

PR Hacks - Upgrading Butterick 6169

$
0
0
Hello everyone!  Hope those of you also on the East coast are keeping warm and safe during the "Blizzard of 2016." We've got at least a foot of snow on the ground already and the storm is not expected to stop until sometime in the wee hours tonight. I foresee a shit ton of shoveling in my future. At least I've got my Froggie pit crew permanently on hot chocolate making duty.  In the meantime let's procrastinate on all that shoveling by talking about this month's pattern hack.
After two months of knit garment hacks it seemed right to give woven fabrics their turn.  I took some inspiration from PR "Best Patterns of 2015" contest entries and finally dusted off my copy of Butterick 6169. Seemed like a great way to finally sew up at least one of those pleather fabrics lurking in my stash. (Let's not talk about how many more are left.)
Butterick 6169 is one of those patterns that is the perfect base for pattern hacking.  So many different design ideas popped into my head that some severe editing was needed. There's only so many weeks in the month for sewing after all.  In the end I went with adding a yoke, changing the front hem line shape, and drafting a collar.  Oh and I changed the in seam pockets to zipper inset pockets.....because I like to torture myself with pleather. ;)
To get all the juicy drafting details hop on over to the PR blog

P.S. Sewing all that pleather was a nail biting experience so I decided to have a little fun with the lining. Meoooow, behold my Jungle January insides! 

P.P.S. - This morning I was a little out of it and accidentally deleted my December PR hacking post.  After spending way too much time googling, "How to recover blog pages," it occurred to me that having all these posts in one place would be very helpful.  I've added a "PR Hacks" tab to the header and will gather all the article links there. That should make finding a specific hack easier in the future. 

A Little Accessory Knitting

$
0
0
Tis the season for the sewing room to be fridged which means KNITTING ALL THE TIME.  Or at least in the evenings when my lizard body has had it with temps below 65 degrees. This month I stuck with small projects to use up some of those random balls of yarn sitting in the stash.

First project was the Bosc Hat.  Knit in Cascade 220 Superwash in the color Ruby.
I have some mixed feelings about this hat mostly stemming from my yarn choice. When it comes to superwash yarn, sock weight is delightful but worsted weight kind of skeeves me out. When I touch it my brain screams, "EWWWWW, it feels weird. So gross." Apparently my brain is a 5 year old girl.
The only reason this yarn is in the stash is thanks to a very sleep deprived Past Heather who thought she was going to knit baby Desmond a bunch of sweaters.  Poor Past Heather, she should have just gone home and knit another garter stitch blanket. Instead she bought a bunch of Cascade superwash and now I'm stubbornly trying to use it.
The Bosc hat pattern comes with two sizes and I cast on the larger one. This turned out to be the wrong decision because the stretchiness of superwash yarn made the brim circumference larger than I prefer.  Oh well, when you refuse to gauge swatch hats these things are gonna happen.  On the plus side the yarn shows off the stitch pattern nicely and I'm pleased with the amount of slouch in the beret.

I have nothing but good things to say about the pattern itself. The instructions are clear and include charts for the stitch pattern, which is my preferred method. This was my "purse project" so I can report that it's easy to figure out where you are on the chart by reading your knitting.  So long story short, I recommend the pattern but not the yarn.

Second project was another beret, the 16 cables hat.  Knit in Rowan Lima in the color 881. (Already glimpsed in my last post.)
I'm much more pleased with this FO because the yarn choice is to my liking and the beret fits around the head snuggly. Being fresh off the Bosc project, I decided to use the large hat size again but go down a needle size for the ribbing. That worked perfectly and I got the snug fit I prefer in a hat. The rest of the knit was pretty straight forward, other than discovering that I couldn't cable without a cable needle.  Between the width of the cable and the yarn construction it was impossible not to start dropping stitches all over the place.  I'm sure the almost black color in a dimly lit room didn't help matters either. I pressed a DPN into service as a cable needle and carried on.
The cable pattern is not charted in the directions, but it is very simple to follow.  Most of the knitting is just knit and purl rounds and all the cable crosses are at regular intervals.  I managed to knock this hat out in a week because it was hard to stop knitting it. I'd recommend both the pattern and yarn on this project.

Finally I made good on my promise to knit Des some socks. Here are "Spice Kids" knit out of some Wollmesie, cause I'm really nice.  Someone might have destroyed the tag when I was winding the yarn so the colorway is a mystery.
I find all Yarnissima patterns a pain in the ass to knit because they use my least favorite construction techniques.  Toe up sock, ick.  Judy's magic cast on, hate it with the heat of a thousand suns.  The recommended M1 technique, there are much easier ways to do this!!!!  (And yes I do them on DPN's because magic loop is my mortal enemy.) But I keep knitting Yarnissima patterns because they're pretty and they feel great on your feet. Something about that annoying to knit gusset construction makes them the most comfortable socks to wear.
In this case I also thought doing them toe up would keep me from knitting the foot too long.  NOPE. Despite trying the sock on multiple times the darn thing was about 1.5" too long once I finished the heel. Ended up knitting the gusset area three times on the first sock, all while muttering a few choice words.  But as you can see I suffered through and fulfilled my Mom promise of handknits.  He's happy and that's what's important. Look at that great smile! Maybe you'll get another pair of socks out of me.......after a couple of months.

Flashback to 2013

$
0
0
I hope your beverages are securely fastened because we're about to do back in time. Queue spinning tardis and Dr. Who theme song. Doo dooo dooooooooooo! We're going back to 2013 when I was about 15 lbs heavier and hadn't completely jumped on the vintage train. It was late August, exactly the time you want to start your Fall/Winter knitting, and plans were afoot.  Past Heather decided to cast on a sweater that had been in the mental queue for a year, the Thermal Pullover from Allyson Dykhuizen.  
As far as I can remember my thought process was, " That stitch pattern is cool and I can finally knit up that gray Cascade 220 that's been in the stash since 2009." Both good points especially since I'd already purchased the pattern in 2012. On the other hand, I'd been knitting long enough to know that a drop shoulder sweater with no shaping wasn't a great idea. At least for me.  
What I remember of the knitting process is that the stitch pattern sucked up yarn and it seemed like I was constantly buying more skeins. Also the first sleeve came out huge and I had to rip it entirely out reknit. It was about this time that I soured on the project, stuffed it in a bag and stuffed the box into a cabinet. What sweater?  I don't know anything about a sweater?  There are only socks.
This year I finally got tired of the sweater taunting on my Ravelry project page went looking for it. Once it was freed from its cabinet I found there was literally only a sleeve left to knit. Really Past Heather? You couldn't buckle down and finish one sleeve.  Oh well, maybe some shiny new project distracted her. It's not like that still happens all the time.  Anyway I spent the end of January knitting the second sleeve and now I have a warm sweater that makes me look dumpy. At least I'm blaming the sweater and not winter induced cake eating.

Now for some actual pattern details.
The body has no shaping as written but I decided to add some in.  Most of the sweater is the 39" bust sizing, but I cast on the stitch count for the 41 3/4" bust.  Around the side seam area I didn't purl 5 to increase one of the "bubbles". After that the border stitches were gradually decreased out until the sweater was at the 39" stitch count.  Here's a shot of that on one side of the sweater.  It's not the best but I wasn't in the mood for recalculating all the numbers to drop in a fake side seam.  After knitting this I'd say that adding more hip room really wasn't needed because the stitch pattern turned out to be very stretchy. 
As mentioned before the sleeves turned out to be very wide.  The stitch count at the cuff in my size is 60 stitches which seems a bit overkill in worsted weight. On my sweater I made decreases in the underseam about every 6 rounds. That made the cuff stitch count closer to the 40 range.  (I didn't do a final count though, so that's a guess.) The twisted rib portion of the cuffs is also an inch longer than suggested because my sleeves were looking a little short.
No changes were made to the collar area which happens to be my favorite part of the sweater.  I sure do like looking at twisted rib even if knitting it kills my wrists. Overall the pattern gets points in my book for it's minimal finishing. The body is knit all in one piece then seamed the shoulders.  The sleeves are picked up afterwards and knit down. The collar is also knit on leaving you only the bottom edge to seam at the end. I'm not sure if I would have completed this project if most of the finishing hadn't already been done.

So you can tell I'm not super enthused about this make, but that's mostly because it doesn't fit my tastes. The stitch pattern wooed me and made me forget about my problems with drop shoulders and oversized sweaters. However if you love those things than I would recommend this pattern. My only real issue is the sleeve width, but that's an easy issue to fix on the fly. Or maybe giant sleeves are also your jam and you like to smuggle pots of jam in them. I won't judge, I've got balls of yarn up mine. 

PR Hacks - Linda Top with Extra Ruching

$
0
0
Hey Guys,  I started February off with a bang of startitis and quickly found myself muslining 3 different projects. The sewing area looked like a tornado of tracing paper had hit and my brain had a similar feeling. I can juggle 2 projects pretty successfully, but 3 was a bridge too far. So either you'll see a ton of FO's at the end of the month or I'll be hiding in the other room with some knitting pretending the trace paper situation isn't insane.

In the meantime I do have a fun piece of business to share, this month's PR hack of the Linda Top.
It's Linda's birthday so Deepika and I decided to celebrate by giving her a new twist.  This version has a scoop neckline and ruching on the sleeve. The hacking skill level on this one is easy! It shouldn't take you more than an hour to adjust the pattern. So if you just want to dip your toes into some pattern manipulation than this one's for you.
As usual all the details are on the PR blog.  Hack on my friends.


Lady in Red - McCalls 6800

$
0
0
Ooooo what's this? Did someone finally wrestle her startitus into submission and finish something? By Grabthar's hammer I Did!  It took a lot of cookie eating, muttering crazily to myself and putting on my "Big Girl Decision Making Pants." One does need bigger pants after so many cookies.
My startitus trouble was caused by the inability to choose fashion fabric. After the muslin stage I hit a wall trying to figure out what fabric to use, get frustrated and start a new project. Then multiply that process a few more times. This problem was a new one to me because Past Heather would have solved it by shopping for more fabric. It's not that new fabric purchases are banned around here or anything. It's just that I've been trying to rifle through the stash first to make sure there isn't something appropriate. Then it seemed like it was always too much trouble to actually go look in the stash. My husband was sleeping the room or it was only 10 minutes until it was time to pick up Des or I felt too tired to pull everything out.  Those of you without dedicated sewing areas know how it is.
In the case of this project, McCall's 6800, I did know exactly what fabric to use but there wasn't quiet enough yardage. I must have spent a week and a half thinking of all the different ways to squeeze this pattern out of 4 yards.

1. Shorten the skirt length like I did on Butterick 5824.
2. Buy some faux fur to use on the collar, hem and cuffs.
3. Switch to the funnel neck option and sew the short version offered in the pattern.

All good options, unless you get stubborn and decide the coat must be sewn like you imagined it. Not living up to being a stereotypical Taurus, not at all.  Anyway, I inconvenienced everyone else in the house by putting 4 yards of 60" coating on the floor and spending a few hours working my cutting layout tetris. "No you can not have any food while I do this. The kitchen is closed....literally because I've blocked the way with fabric."

Aided by the fact that this wool coating doesn't have a visible nap, I rotated all the side fronts/backs in the opposite direction to the middle fronts/backs. Being able to nest the pieces with large skirt sweeps together freed up a lot of yardage. After that the only piece that wouldn't fit was the facings. Being so close to victory I decided to piece the facings together at the waist thereby using the two small chunks of yardage that was left. Voila, my stubbornness paid off. "HA HA! I Told You I'd Make It Work," I yelled at nobody in particular. Des just sighed and asked if he could finally have a snack now. (He'd eaten 4 things in the previous hour so don't feel sorry for him. He's got his mother's "must always be foraging" genes.)
Now that I've woven my tale of fabric cutting drama let's talk about McCall's 6800 a bit. This is one of those patterns that popped up on my radar after seeing some FO's appear on the internet. My interest was peaked enough to go have a gander at the technical drawings and Holy Cow this is Big 4 patterning done right.

1. Pattern Comes With A Two Piece Sleeve! Granted coat patterns with one piece sleeves might be my own personal pet peeve instead of a conspiracy of lazy drafting. Seriously though it's better drafting for outerwear meant to be sewn in a heavy weight fabric.

2. Collar and Hem Options Huzzah! This is the sort of thing that fills me with goodwill towards a pattern. When you're working from the block these sort of variations don't take too long to draft. But if I was trying to reverse engineer a coat with lapels to higher neckline it would be a total pain in the ass.

3. Additional Design elements. Just having the various collars and hems was swell but they didn't stop there. The pattern also comes with a button in hood or faux fur collar and a belt option. Good on you McCall's, this pattern is stuffed with ways to customize your coat.

I do have two very minor niggles about the pattern. The first is that the pocket bags are very shallow. I subbed in the ones from Butterick 5824 since they were perfect.  The second is that the button placement might be a bit too far apart.  I say might because I'm not 100% sure that my button choice isn't to blame. Anyway both of these "problems" are easy to fix and do not detract from my obvious love of the pattern.
My version is mostly View B. Instead of the waterfall hemline the straight hemline from View D was swapped in.  I also decided to put the pockets in the side seam area instead of using the front princess line seam. The pattern marks pocket placement in both locations, so that's easy peasy. You'll see in the review area that I also lucked out and didn't have to do many fitting alterations on my muslin. In fact the only Oops moment was not accounting for the weight of the skirt changing the fit around the waist.  My muslin fit perfectly, but in the heavier wool that area had lot more ease than I was looking for. This would have been slightly less of an aggravation if the lining hadn't already been sewn closed. Derp.  In these photos the side seams have been taken in about 1.25".  Afterwards I went back and took in the CB seam about 1" and moved that top button a bit.

Pattern
McCall's 6800 Model is like, "I can't hear you over my sassy coat."

Fabrics used
Italian Wool Flannel coating originally from Gorgeous Fabrics. I bought mine in 2013 but they seem to stock it regularly every year. This is the same coating that I used for both Butterick 5824 and the Ottobre coat I made for my sister.

Rayon/Acetate Lining. Also a stashed GF purchase but they seem to have it/something like it still in stock.

Pattern changes/alterations
1. Blended together sizes 16 and 18.
2. Made my standard 1/2" forward shoulder adjustment to both the shoulder and sleeve.
3. Took in the back 1" spread evenly between the side back seams.

My on the fly alteration of the waist was to curve in the seam just at the waist area.  I took a total of 1.25" out at each side seam and 1" out of the CB seam.

Confessions/Advice
- If you're using a medium weight wool like me I'd suggest fitting the muslin very close to the waist. The weight of the skirt will pull the waist area out giving you more ease.

- If you don't sew muslins then don't be like me and do a final fit check after sewing the bottom of the lining to the coat. You know so you don't have to rip up a bunch of hand sewing to take in some side seams.

- I am wearing a petticoat in these pictures to fluff the skirt out a bit. The coat does look nice sans petticoat but I forgot to take any pictures.

Husband Comment
"Hey princess, I like all your seams." Then he grabbed the lapels and folded them up towards my neck and asked why there wasn't a button there to secure them.  I think he must have been sneakily staring at the technical flats.
P.S - We had a disagreement that my scarves wouldn't fill in the neckline area.  Feast your eyes on the photographic evidence Steve. ;)

My Final Thoughts
You already know I think the pattern is pretty great. Lots of design options, great drafting, you can buy it on sale right now for 3.99 on the McCall's website. The only downside might be the amount of yardage you need for the longer view. If you don't have 5+ yards of coating in your stash, Gorgeous Fabrics does have all the Italian Wool Flannel Coating on sale right now for $15.00 a yard. I'm sure Fabric Mart has some even better deals on coating if you do a bit of browsing.  And with that I will stop being an enabler and leave you with the sort of twirling picture necessary when full skirts are involved. Until next time my friends.

Official Vintage Pledge

$
0
0
Hello everyone, thanks so much for all your kind comments on McCall's 6800. The red coat is already in high rotation in the wardrobe.  I love it when modern patterns fit right in with my vintage or vintage inspired pieces. Speaking of vintage sewing, it's time for me to officially declare my vintage pledge for 2016.  Gotta have your goals written down....mostly because mommy brain seems to be a condition that you never fully recover from.

During 2016, I Heather Beckley, pledge to sew up 5 vintage patterns. This includes vintage re-issues and "true" vintage patterns.

Back in January I posted a list of three 40's era patterns to sew this year and have made a small bit of progress on that front.  So far Hollywood Patterns 1032 has been successfully graded and muslined.
 I hit a snag after realizing the fabric I'd had in mind would be too thick to work with the pattern. I'd been thinking "suit jacket" when the pattern was thinking "blouse".  Probably because the pattern envelope clearly said blouse. Ha haa, Reading!  Anyway, the blouse portion has finally been started in real fabric so you "should" see that sometime in March.

This week I've also belatedly realized that Easter is in March this year. Curses, already behind on any Easter dress sewing. Why was I not born a natural planner? Oh well, surely my speedy sewing skills can overcome any planning inadequacies. With that cocky attitude I purchased both of these dress patterns yesterday because sometimes you can't choose.
Both of these are already in my bust size so I'll only need to bump out the bottom half a bit. Seems like finishing at least one of them for Easter is doable. Cross your fingers for me. :)


Vintage Pledge #1 - Hollywood 1032

$
0
0
After much blathering on about this pattern for many posts, I'm pleased to unveil my finished Hollywood 1032.  Not in red, as previously discussed, but PLAID! A lady has the prerogative to change her mind after all.
After "discovering" that Hollywood 1032 was drafted to be a blouse and skirt instead of a suit, I still wanted a jacket like feel to the blouse. Exactly how to do this didn't cross my mind until stumbling across this plaid cotton shirting. "Perfect!" I thought, "This totally reads as jackety blouse to me."

Perfect except for two things
1. The back peplum was impossible to plaid match along the side seams. If I'd started cutting with that pattern piece it probably could have been managed. Of course I started with the front like I always do because that's the area you really don't want to mess up.

2. Elbow darts and plaid are not the best mix. This honestly didn't even cross my mind until the blouse was done and I hung it on a hanger.  Ooops, weird biased plaid at the bottom of the sleeves, too late to fix that now.

But whatever, I'd probably do it again because plaid is awesome and I really like this outfit.
This was my first time sewing an unprinted pattern and it went pretty well.  Transferring pattern pieces to new paper is a bit tricky because they are hard to see through the paper. Then I got some good advice off of Instagram to put dark paper behind the patterns. What a difference this makes! You still need to do some "pattern braille" for the darts/other punch outs but it works wonders for everything else.
The pattern illustration compared to the actual drafting was mostly accurate. The only glaring difference was that the peplum length was drafted to be much shorter than drawn.  I added an 1" of length to make it match up to the illustration and because that's more flattering for my figure.  Sewing wise this one was easy to whip up after all that waffling over fabric.  I'd definitely buy more Hollywood patterns in the future. :)

Pattern
Hollywood 1032

Fabrics used
Stashed Plaid cotton shirting - Originally from Fabrics and Trimmings on Etsy
Stretch wool suiting maybe from EOS.

Pattern changes/alterations
1. Graded the size 32" bust up to a 36" bust.  I used the same 4" grade described here. This worked for all the pieces other than extending the collar that becomes the back facing. Here I lucked out and was able to properly guess how much to add thanks to some notches.
BTW - It's interesting how extending the front facing and collar up to finish the back of the neck in this manner was a pretty standard drafting technique in the past.  Now it's something we only do for if there's a wrap around collar.

2. Added standard 1/2" forward shoulder adjustment to the shoulder and sleeve head.

3. Dropped the bust dart 1".

4. Added a scant 1/4" to the bottom part of the princess line seam. The placement didn't look proportionally correct on my body without it.

5. Shortened the waist length 1/2" above peplum.

6. Added 1" additional length to the peplum.

Confessions/Advice
1. Don't forget about your elbow darts when you pull out a plaid. Derp.

2. Confession - I might be addicted to hug a snug and need an intervention.  It's something I'd never ever bought until the Veronica coat and now I can't stop putting it on hems. But see, so pretty.

3. I also covered shoulder pads with self fabric for the first time. All the pretty insides!

Husband Comment
"Are you going to a fancy business meeting?" Why yes, I like to meet my donuts at the boardroom before eating them.

My Final Thoughts
Great start to my Vintage Pledge year.  I like the silhouette of both of the pieces and love that I can mix the skirt with various other tops. This should be the last "winterish" project for awhile. Look forward to lots of flora patterns in the future.

Rosey Easter Dress

$
0
0
Well hello there, I blinked my eyes and suddenly the month of March was just about over. Must have been some sort of Easter candy induced coma.  My love for things coated in chocolate has no bounds other than my now too tight clothing.

Between scarfing down egg shaped treats, I got to work sewing up this year's Easter dress.  You might remember that there were two pattern contenders, Hollywood 1159 and Simplicity 4958. Well I got super cocky and decided to muslin both patterns. Then threw them in a ring and let the dresses battle it out for supremacy.....er I mean easy sewability?  The Simplicity pattern won by not needing any sort of major alterations and by flashing it's curved sleeve hem at me. Oooo pattern eye candy, Momma likes.
There's not too much to say about this this project because it was pretty much smooth sailing from start to finish.  The bodice of the dress has V shaped waist darts that radiate from the CF and the back is gathered at the waist instead of darted. This results in a semi fitted top that cinches in at the waist and then flows out in a narrow 4 paneled A-line skirt. All of that was easy to fit and assemble.
Most of my sewing time was spent is getting smooth curves on the neckline and sleeve areas. Usually I mark my own guidelines for scallops, but this pattern helpfully included them on all the facing pattern pieces. All I had to do was transfer the punch outs onto the fabric and get stitching.
Since a strong shoulder was such a big part of a fashionable silhouette in the 40's pretty much every pattern calls for shoulder pads. This sometimes gives me 80's flashbacks of the terrifying kind. NOOOO, linebacker shoulders everywhere!!!  Right now I'm making the shoulder pad decision on a pattern by pattern basis. On this dress I did end up adding 1/2" pads because the semi fitted bodice needed a big shoulder to anchor the blousines of the design. At least that's my story and I'm sticking to it.

Pattern
Simplicity 4958

Fabrics used
Cotton Sateen from the Gertie/JoAnn's line from 2015. I noticed she has this fabric for sale in her Etsy shop now if you're dying to have some. I enjoyed sewing sewing it and wouldn't make padding my stash with a bit more.

Pattern changes/alterations
1. Bumped out the waist and hip 1/2" for my larger lower half

2. Made my standard 1/2" forward shoulder adjustment to the shoulder and sleeve.

3. Dropped the bust dart 1".

Confessions/Advice
Nothing to disclose on this project other than this rose pattern placement being entirely accidental. I loooove it.

Husband Comment
"Hey pretty rose covered lady, I like your sleeves."

My Final Thoughts
These photos don't really do the dress justice. It was one of those days where the sun piercing my eyeballs threw off all the picture taking mojo. This dress makes me feel pretty and comfortable, but I didn't feel that translated into these pics. Next time I bring some sunglasses and pick a different location that isn't a bunch of uneven steps. Future goals right? To sum it all up, enjoyable vintage pattern to sew/wear, cotton sateen is still my favorite fabric of all time, and shoulder pads are sometimes good.  See you guys in April!

Stash Busting April Theme - Facing your Fabric Fears

$
0
0
This month I'm the hosting the Stash busting sew-a-long group theme which is "Facing your Fabric Fears." I guess this means I better pull the tricky fabric bin out of the back of the stash cave. At least froggie will get to sleep in silk all month.

For those of you who may not know the Stash busting sew-a-long group was created as a support group of sorts for those of us who felt overwhelmed by our stashes. We wanted a way to motivate ourselves to sew out of the stash instead of constantly buying new fabric.  We have a monthly theme to get the creative juices flowing but you can sew whatever you want.  Here's a link to our facebook group if you feel like joining the party.

To start off the month put together a list of tips and links to helpful tutorials for all the stereotypical tricky fabrics.

Silk 
- Stiffen light weight silk fabrics, like chiffon and georgette, before cutting. My favorite method is soaking the fabric in gelatin solution as described in this Threads article. This does take a little pre-planning since the fabric will need time to dry before cutting.  What I like to do is mix up my gelation solution and put it and the fabric into a rubbermaid dish pan. (A bucket or the kitchen sink would also work fine.) After letting the fabric soak for an hour, I take it out and roll it in a towel to get rid of the extra water. Then the fabric is put on a drying rack to dry overnight. After the fabric is dry it can be pressed on low heat if any wrinkles happened during drying. Then you're ready to cut

- Cut silk out in a "paper sandwich." You've probably heard this before and I'm here to tell you that it does make a BIG difference.  Let's not talk about the time I decided to cut georgette without paper.....total disaster. Grainline Studios has a nice tutorial on how she cuts using this technique. I do it the same way other than using the floor and a roll of Kraft paper. Use the sharpest set of shears you have to make everything go as smooth as possible.

- Use a new sharp needle.  You don't want to accidentally snag your fabric just because your needle's gone dull. Also make sure you're using the right size needle for your fabric weight.

- Empty out the water in your iron and use a pressing cloth. Don't take the chance of your ironing peeing all over your silk project. A press cloth is another great way of protecting your fabric.  Silk organza is my personal favorite pressing clothing because you can see through it while pressing.


Rayon
- Pre-wash, pre-wash, pre-wash because rayon will shrink like nobody's business.

- Give yourself some cutting help.  Cutting rayon isn't as tricky as silk, but using some of the silk techniques can keep you from getting wonky pattern pieces.  Personally I like to stiffen rayon up with some spray starch and then cut it laying on some paper.

- Let it hang before you hem it. I've had more wonky hemlines with rayon than anything else so let it drop before doing all your hand sewing work.


Plaids
- Choose a plaid line for all your matching. When I start cutting a plaid project first I mark all my pattern pieces with a horizontal like in this Grainline Studio post.  That way I know all my vertical plaid will match up as long as I place them on the same plaid line.

- When cutting pieces that are mirror images use the first to help line up the plaid on the second. For example my pattern has two back skirts to cut.  When cutting the first pattern piece I use my plaid line mark and straight of grain to line up the pattern. Then when I cut the second piece I flip the first piece on top of the pattern and use that to help line up the plaid.

- Sew with a walking foot to help match plaid along the seams.


Leather
- Get yourself some clips to use instead of pins. You can go high end and buy some Clover Wonder Clips or be cheap like me and buy some small binder clips.

- Use a leather needle and 100% polyester thread. You don't want to worry about cotton thread deteriorating on your leather project.

- Teflon or roller feet are great for sewing leather because they don't stick to the hide. You can also put some scotch tape on the bottom of a regular foot to keep it from sticking.

- Use a hammer to help flatten any seams or darts that you don't want to topstitch flat.

- Double sided tape is helpful for positioning things like zippers on welt pockets.


Sequins
- The By Hand London blog put together a very comprehensive post on working with sequined fabric. Thinking I should don some safety goggles and finally sew the black sequin yardage in the stash.


Knits
- We just finished up a knits themed month in the group and Heather D rounded up a lot of great tips. Here's a link to her blog posts.

- I think of my pal Gillian as "The queen of knits." Her Lazy tips for sewing knits series is great of any newbies out there.

- Get yourself a self healing mat and a rotary cutter to make cutting out knits a breeze.

- I also highly recommend buying yourself a serger if you really like working with knits. My personal machine is the fairly economical priced Brother 104D. I've been using mine for several years and it's probably the most dependable machine in my sewing room.


That's all the tips and tricks I've run across in my personal experience. How about you guys? Do you have any great tips you like to share? Leave them in the comments section and I will have Froggie collate them for everyone's benefit.

Taming the Lime Leopard

$
0
0
In March I had one of those fabric buying binges brought on by thoughts of Spring/Summer clothing. My stash busting spreadsheet assured me that this is an annual occurrence. Once florals and hawaiian prints start popping up I get all weak at the knees and scream,"Take my money!" Even so there was a certain amount of guilt about adding almost 15 yards of fabric to the stash in the space of the month. What to do, what to do?  Maybe sew up some old stash into transitional clothing? Sounds like a plan. I even doubled down and choose one of the patterns that was in my "to sew" January post. Namely the Du Barry wrap blouse. Good blogger, you get all the cookies.
The Du Barry blouse was another one of those 32" bust patterns that I just "had to have" even though I'm a 36" bust.  Grading never seems easier than when you're pushing the purchase button on Etsy. But when it comes time to do the grading work I feel like a complete fraud. "Don't know what I'm doing, tra la la la la. Look over there instead." So after pulling out the pattern I waited for the usual sense of panic and dread to overtake me. Instead my brain said, "Hey we just graded that whole Hollywood pattern and it turned out fine. Just do the same thing knucklehead." It was then that I realized that maybe, just maybe, I wasn't a fraud but had learned to do a pretty good 4" grade. Huzzah!

 Incase you're wondering what my personal grading steps are I'll break out for you.
1. Trace the pattern...of course.

2. Since I'm pear shaped 1/2" is added to the waist and hip area along the side seam. In the case of 40's skirts I usually add that extra 1/2" of width down the whole length.

3. For pattern pieces on the quarter, I draw 3 grading lines and slash the spread the pattern. Two of the lines are spread 3/8" and the third is spread a 1/4".  (Was pretty pleased with myself for remembering the front blouse on this pattern is not on the quarter and needed to be slashed and spread 2".)

4. Finally I add 1/2" of extra height to the pattern along the shoulder and neckline. If there's some sort of attached neck facing, like on the Hollywood blouse, I usually walk the pattern on the seamline to see how much extra length is needed.

At this point I'll make any standard fitting adjustments for my figure and then sew a muslin.  Usually the muslin fits pretty decently and I can tinker with seam placement, lengths, etc.  The Du Barry wrap blouse was an easy fitting job since the shoulder pleats give you plenty of bust room and the tie makes the waist width easily adjustable. After the first muslin all that needed to be done was remove some of the height from the sleeve caps. Those babies were impossible to ease in without puckers.
For the fabric I choose some silk crepe de chine that had been in the stash for a couple of years. Sewing pleats in silk wasn't exactly my idea of a good time, but froggie and I got through it with a minor amount of ripping. We also learned from past mistakes and hand sewed the neckline bias binding on out of the gate. Better to do the hand stitching first thing then after you've ripped out your machine stitches 3 times. A person could go leopard blind doing a thing like that.


Pattern
Du Barry 5510, blouse portion only.

Fabrics used
Silk Crepe de Chine from the stash.

Pattern changes/alterations
1. Graded the pattern up from a 32 bust to a 36 bust.

2. Did standard 1/2" forward shoulder adjustment to the shoulder and sleeve cap

3. Reduced the sleeve cap height by 1/2" because they seemed to have too much ease to set properly.

Confessions/Advice
- I said on my instagram feed that this isn't a blouse made for raising your arms. Even with an at waist skirt any upward arm movement results in some bare midriff.

- The downside of a silk wrap blouse is that the ties starts to loosen as you wear it.  I haven't had a wardrobe malfunction, but do need to retie the blouse during the day.

- Put 1/4" shoulder pads in this because I've been brainwashed by the 40's into worrying about droopy shoulders.

- In case you were wondering how does this particular wrap blouse wrap, then here's a handy illustration from the instructions.
The pattern has a short tie and a long tie, the short tie goes on the blouse half that crosses in front. On the other blouse half the long tie comes out of a hole you leave in the side seam, wraps around the back and ties to the short tie.

Husband Comment
"Never seen a green leopard before but it's silky and nice."

My Final Thoughts
Despite my confession about the length occasionally causing accidental bare midriff, I've worn this blouse every week since finishing it. It just feels so elegant in both style and fabrication.  Figure I need to add a pair of high waisted trousers and high waisted skirt into the sewing list. Then I can pair them with this blouse and wave my hands in the air like I just don't care. Cause I won't because my hats are too fabulous. ;) Have a great friends. Next time we "talk" I'll have a dress that's refreshing as a tall glass of lemonade. Mmm delicious.

PR Hacks - 50's Style Shirt Dress

$
0
0
After a month's hiatus I've got another hacking article posted over on Pattern Review. Sometimes a girl has to take a month off to sew 3 Easter dresses, you know how it is. The April post features a 50's style shirt dress hack based on McCalls 6891. In the article I talk about how to convert set in sleeves to kimono sleeves and how to redraw the neckline. Nice thing about this hack is that you can mix and match either one of those new design elements with the original pattern. You can even switch up the skirt portion for a slightly different look. Ahh shirt dresses, they are the best.  If you'd like one too then hop on over to the PR blog and read up.  

Viewing all 231 articles
Browse latest View live